Elevating Your Spuma Game
While the quick blender method for raspberry spuma has taken social media by storm as one of the hottest viral food trends, there’s a more traditional approach that yields an even more refined and stable result: the cooked syrup method. This technique, favored by professional pastry chefs and serious home cooks, involves creating a concentrated raspberry syrup that’s then folded into a perfectly whipped meringue. The result is a spuma with superior texture, more intense flavor, and better stability—perfect for special occasions or when you want to impress your guests with restaurant-quality dessert.
Understanding the Science Behind the Cooked Syrup Method
The cooked syrup method differs fundamentally from the blender approach in several key ways. When you cook raspberries with sugar, you’re not just combining ingredients—you’re creating a concentrated flavor base while also breaking down the fruit’s cellular structure more completely. This process intensifies the raspberry flavor and creates a smoother, more uniform texture.
Additionally, cooking the fruit helps eliminate excess moisture that can destabilize the final spuma. The heat also helps dissolve the sugar completely, creating a syrup that integrates more seamlessly with the whipped egg whites. The result is a more stable foam that holds its shape longer and has a more professional appearance and mouthfeel.
This method also addresses concerns about raw egg safety through the cooking process, which helps stabilize the eggs while creating a more professional result. Understanding the differences between spuma, mousse, and espuma can help you appreciate why this cooked syrup technique produces such exceptional results compared to simpler preparation methods.
The Traditional Cooked Syrup Raspberry Spuma Recipe
Ingredients
- 2 cups fresh raspberries (or 1 3/4 cups if using frozen, thawed)
- 1/2 cup granulated sugar, divided
- 2 tablespoons water
- 4 large egg whites, at room temperature
- Pinch of salt
- 1 teaspoon lemon juice (optional, for stability)
- Fresh raspberries and mint for garnish
Equipment Needed
- Medium saucepan
- Fine-mesh sieve
- Large mixing bowl
- Electric mixer (hand or stand mixer)
- Rubber spatula
- Serving glasses or bowls
Step-by-Step Instructions
Step 1: Create the Raspberry Syrup

Begin by combining the raspberries, 1/4 cup of sugar, and water in a medium saucepan. Place over medium heat and cook, stirring frequently, for 5-7 minutes. As the mixture heats, use a wooden spoon to gently mash the raspberries, helping them break down and release their juices.
Continue cooking until the mixture reaches a jam-like consistency and has reduced by about one-third. The raspberries should be completely broken down, and the mixture should coat the back of a spoon. Remove from heat and immediately strain through a fine-mesh sieve, pressing the solids with the back of a spoon to extract as much liquid as possible. Discard the seeds and pulp.
When selecting your raspberries, refer to our summer berries guide for tips on choosing the best fruit for maximum flavor concentration in your syrup.
You should have approximately 1/2 to 2/3 cup of smooth, concentrated raspberry syrup. Set this aside to cool to room temperature—this is crucial, as hot syrup will deflate your meringue.
Step 2: Prepare the Meringue Base
While your syrup cools, prepare your meringue. Ensure your mixing bowl and beaters are completely clean and free of any grease or residue. Even a small amount of fat can prevent egg whites from whipping properly.
Place the egg whites in the bowl and add a pinch of salt. Begin whipping on medium speed until the whites become foamy and start to hold their shape. This usually takes 2-3 minutes.
Step 3: Create Stiff Peaks
Gradually increase the mixer speed to medium-high and continue whipping until soft peaks form. At this point, begin adding the remaining 1/4 cup of sugar, one tablespoon at a time, allowing each addition to be fully incorporated before adding the next.
Continue whipping until the meringue forms stiff, glossy peaks that hold their shape when the beaters are lifted. The mixture should look smooth and shiny, not grainy or separated. If using lemon juice for added stability, add it during the final minute of whipping.
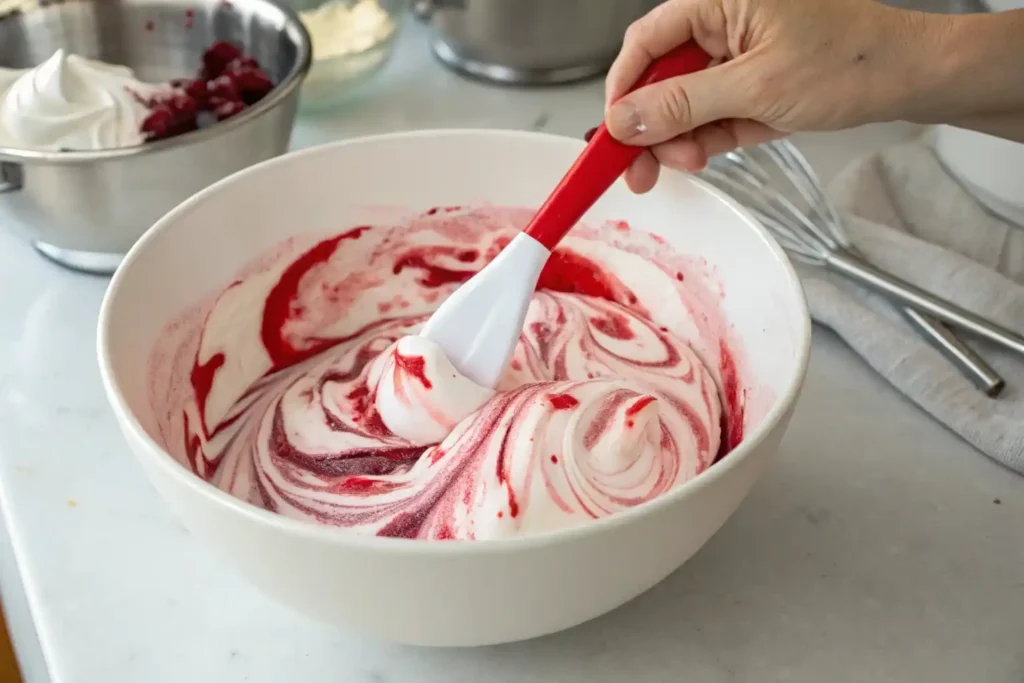
Step 4: Fold in the Raspberry Syrup
This is the most critical step in the process. Using a large rubber spatula, add about one-third of the cooled raspberry syrup to the meringue. Fold it in using gentle, sweeping motions, cutting down through the center of the mixture, along the bottom of the bowl, and up the sides.
Add the remaining syrup in two more additions, folding gently but thoroughly after each addition. The goal is to create a uniform pink color while maintaining as much air in the mixture as possible. The final spuma should be light, airy, and evenly colored.
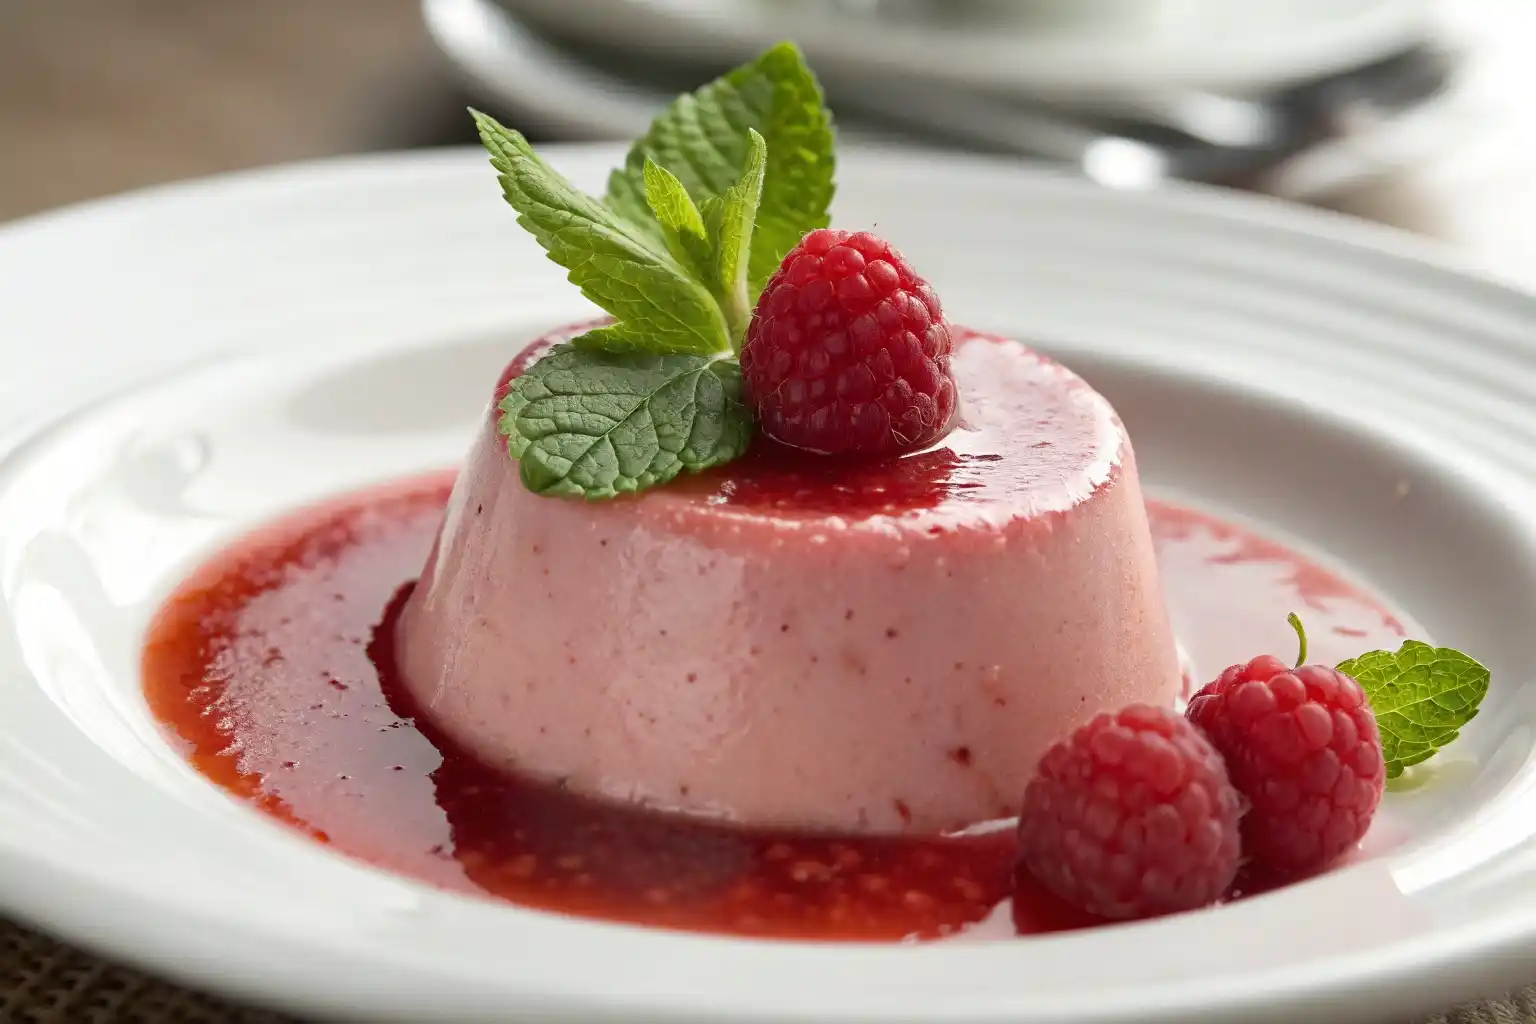
Step 5: Serve and Enjoy
Divide the spuma among serving glasses or bowls and serve immediately for the lightest texture. Alternatively, you can chill it in the refrigerator for 1-2 hours for a firmer consistency, or freeze for 2-3 hours for an ice cream-like treat.
Garnish with fresh raspberries and a sprig of mint for an elegant presentation.
Advanced Techniques and Variations
Italian Meringue Method
For an even more stable result, you can use the Italian meringue technique. This involves creating a hot sugar syrup (heated to 240°F/115°C) and slowly pouring it into whipping egg whites. This method pasteurizes the eggs and creates an incredibly stable meringue that holds its shape for hours.
To adapt this recipe for Italian meringue:
1.Combine 1/4 cup sugar with 2 tablespoons water in a small saucepan
2.Heat to 240°F (115°C) using a candy thermometer
3.While the syrup heats, whip egg whites to soft peaks
4.Slowly pour the hot syrup into the whipping whites
5.Continue whipping until the meringue cools to room temperature
6.Fold in the cooled raspberry syrup as directed
This Italian meringue approach completely eliminates any raw egg safety concerns since the hot syrup effectively pasteurizes the egg whites. For those who prefer completely egg-free alternatives, you might also enjoy our vegan raspberry spuma using aquafaba instead of traditional meringue.
Flavor Enhancements
- The cooked syrup method lends itself beautifully to flavor variations:
- Raspberry-Rose: Add a few drops of rose water to the cooling syrup
- Raspberry-Vanilla: Include a vanilla bean or extract in the cooking process
- Raspberry-Lavender: Steep dried culinary lavender in the hot syrup, then strain
- Spiced Raspberry: Add a cinnamon stick or cardamom pods while cooking
Professional Presentation Tips
- Quenelle shaping: Use two spoons to create elegant oval shapes
- Piping: Transfer to a piping bag fitted with a star tip for decorative swirls
- Layered presentation: Alternate layers of spuma with fresh berries in clear glasses
- Garnish creativity: Consider candied raspberries, chocolate shavings, or edible flowers
Troubleshooting Common Issues
Syrup Too Thick or Thin
- Too thick: Add a tablespoon of water and gently reheat to thin
- Too thin: Return to heat and cook a bit longer to reduce further
Meringue Problems
- Won’t whip: Check that bowl and beaters are completely clean; even a trace of fat can prevent whipping
- Grainy texture: Sugar wasn’t fully dissolved; add it more gradually next time
- Deflates quickly: Overwhipped or syrup was too warm when folded in
Final Texture Issues
- Too dense: Likely overmixed when folding in syrup; use gentler motions
- Separates: Syrup may have been too warm, or meringue wasn’t stable enough
Storage and Make-Ahead Considerations
The cooked syrup method produces a more stable spuma than the blender version, but it’s still best enjoyed fresh. Here are some storage guidelines:
Short-term Storage
- Refrigerator: Up to 24 hours, though some deflation is normal
- Serving tip: Give it a gentle stir before serving if it has separated slightly
Freezing Options
- Frozen spuma: Freeze in individual portions for 2-3 hours for a sorbet-like texture, or follow our specialized techniques in the raspberry spuma ice cream guide for optimal frozen results
- Make-ahead syrup: The raspberry syrup can be made up to 3 days in advance and stored in the refrigerator
Why Choose the Cooked Syrup Method?
While the blender method offers convenience and speed, the cooked syrup method provides several distinct advantages:
Superior Flavor
Cooking concentrates the raspberry flavor, creating a more intense and complex taste profile. The reduction process also helps balance the natural tartness of raspberries with the added sweetness.
Better Texture
The smooth, seed-free syrup integrates more seamlessly with the meringue, creating a silkier mouthfeel without the slight grittiness that can sometimes occur with the blender method.
Enhanced Stability
The cooked syrup method produces a more stable foam that holds its shape longer, making it ideal for entertaining or special occasions where presentation matters.
Professional Results
Perfect for Health-Conscious Entertaining
This method fits beautifully into healthy summer desserts collections, offering a lighter alternative to heavy cream-based desserts while delivering sophisticated flavors. The technique allows you to control sugar content and creates a naturally gluten-free option that works for various dietary preferences.
Conclusion: Mastering the Art of Raspberry Spuma
The cooked syrup method for raspberry spuma represents the perfect marriage of traditional technique and modern appeal. While it requires a bit more time and attention than the viral blender version featured in our main raspberry spuma recipe, the results speak for themselves: a more refined, stable, and intensely flavored dessert that’s worthy of your most special occasions.
Whether you’re looking to impress dinner guests, celebrate a special milestone, or simply elevate your dessert game, mastering this technique will add a valuable skill to your culinary repertoire. The extra effort invested in creating the perfect raspberry syrup and meringue pays dividends in both flavor and presentation, proving that sometimes the traditional methods really are the best. For those interested in exploring the full range of spuma variations, this cooked syrup method serves as an excellent foundation for understanding professional-level dessert techniques.
Print
Traditional Cooked Syrup Raspberry Spuma
A refined and stable raspberry spuma crafted using the traditional cooked syrup method, ideal for impressing guests with a professional dessert.
- Total Time: 35 minutes
- Yield: 4 servings 1x
Ingredients
- 2 cups fresh raspberries (or 1 3/4 cups if using frozen, thawed)
- 1/2 cup granulated sugar, divided
- 2 tablespoons water
- 4 large egg whites, at room temperature
- Pinch of salt
- 1 teaspoon lemon juice (optional, for stability)
- Fresh raspberries and mint for garnish
Instructions
- Combine raspberries, 1/4 cup sugar, and water in a medium saucepan. Cook over medium heat, mashing raspberries, for 5-7 minutes until jam-like.
- Strain the mixture through a fine-mesh sieve to extract syrup; discard solids and allow to cool.
- While cooling, whip egg whites with a pinch of salt until foamy, then gradually add remaining sugar until stiff peaks form.
- Gently fold cooled raspberry syrup into meringue in three additions to maintain airiness.
- Serve immediately, or chill for firmer consistency. Garnish with fresh raspberries and mint.
Notes
To enhance stability, consider using the Italian meringue method. For flavor variations, infuse with rose water, vanilla, lavender, or spices while cooking the syrup.
- Prep Time: 20 minutes
- Cook Time: 15 minutes
- Category: Dessert
- Method: Whipping and Folding
- Cuisine: Italian
- Diet: Vegetarian
Nutrition
- Serving Size: 1 serving
- Calories: 220
- Sugar: 25g
- Sodium: 5mg
- Fat: 0g
- Saturated Fat: 0g
- Unsaturated Fat: 0g
- Trans Fat: 0g
- Carbohydrates: 55g
- Fiber: 4g
- Protein: 2g
- Cholesterol: 0mg
Keywords: raspberry spuma, dessert, whipped dessert, cooked syrup method, professional pastry